Yard Planter Project on Castors
March 17, 2013 · Filed under Garden and Home · Tagged box, city, dampproofers, gardening, henry sealer, home depot, planter, plants, season crops, small garden, vegtables, youtube ideas
The Planter Project on Castors
If you have read my blog before you already know I keep and maintain a small city garden. The one thing I always have difficulty with is quick growing, early spring and short season crops due to the fact that the sun is so low in the sky my home shades most of the garden. Our temperatures are pretty mild but the vegetation still needs a lot of sun.
So, I thought maybe I could get some sort of planter that I could move around. Plus I could save space in the main garden for vegetables that I can process and freeze. I could buy gardening seeded tape strips and grow smaller harvests of things like assorted lettuce and radishes. These veggies are so good but I generally end up giving most of it away since a row in the main garden becomes ripe at the same time.
I decided to check out various ideas on YouTube channels. I came up with an idea from three of the videos I watched and immediately sent these videos to my Project Manager (my mom’s hubby). I laugh because without his expertise I wouldn’t be able to begin to figure out what my needs would be. He said we could make one pretty easily. He would be the crafter – he has the tools – and I would be the helper.
We made our trip to Home Depot for the supplies we needed. Galvanized screws, two by fours, sealer, nuts and bolts and casters. When we came back and went to work sawing the lumber into the measured pieces.
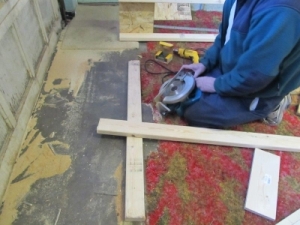
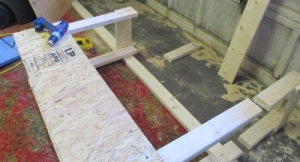
There had to be some support for the legs on the bottom where the casters would be placed so we used some 1 x 6 inch board to make the legs stable. Most of the time I was holding or moving things around but my Project Manager did tutor me in using a drill and learning the electric screwdriver because I need practice with those tools!
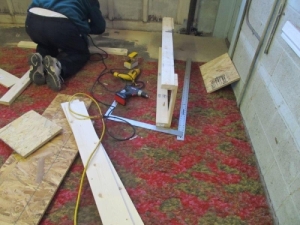
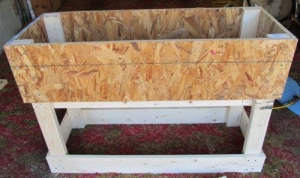
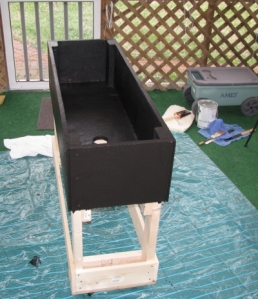
After we got all the pieces cut then we started to put the box together. The Project Manager had left over sheathing from a previous shed project so that saved on some of the cost. This is the material we used for the walls of the box.
Then we ran into a little snag. I was a little too short for the planter. Well, I suppose I would have been close enough to eat the veggies right out of the box! Laughing to myself.
Anyway, not to be demoralized we continued on and made the legs shorter. Project Manager, also, made the allowance for those castors that had to go on the bottom. This little delay didn’t take very long to fix. Just a few drilled holes. Oh, I forgot to mention that we drilled all the screw holes first before using the screws so we wouldn’t split any wood.
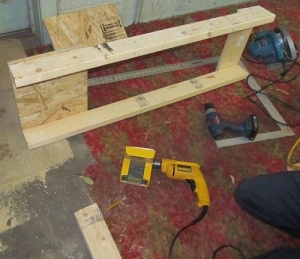
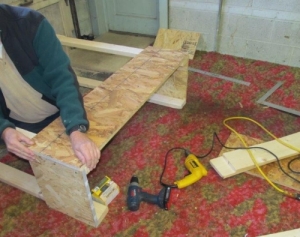
Here is a view from the top before the bottom was put on as this last piece would have to have a drain hole. The second picture is from the side before the castors went on.
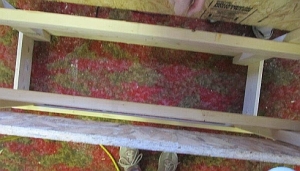
This is where we placed a cross beam for extra support because after the dirt is put into the box and water is added it will get heavier.

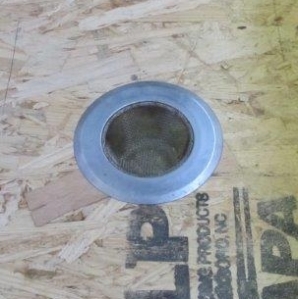
The drain hole was put into the bottom. As one of the YouTube videos pointed out, I will be able to place a bucket underneath to catch the water and reuse it to water again. Neat huh?
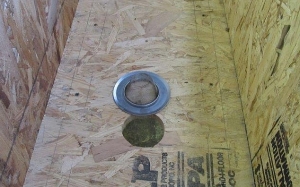
Inserted into the hole is a wired drain catch that you can buy at most Dollar Stores. I will put some small pebbles into the catch before I put the dirt into the box so that I don’t loose to much soil while the water drains out.
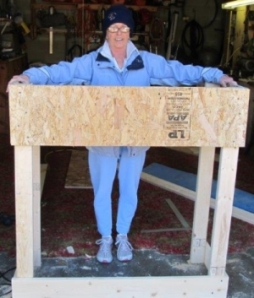
After we were finished putting everything together the Project Manager and I lifted the planter onto the truck bed and drove it to my home.
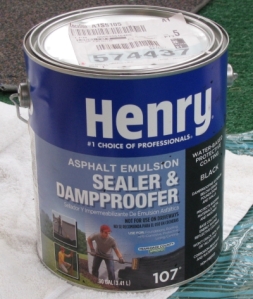
My next job was to paint with two coats of sealer and two coats of exterior paint. This turned out to take a little longer because the weather forecast called for rain. The sealer and paint had to have temperatures in the 50’s before it could be applied. I did get the first coat of sealer on the box and then moved it into the patio to keep it out of the weather. The humidity would take the second coat longer to dry but nothing would get wet from rain.
The sealer I used was purchased at Home Depot and is called Henry Sealer and Damp Proofer. It will not make the soil toxic as far as I have read. Painting this puppy was a little tricker that I thought because I felt so much like a contorsionist. A few aches and pains but I will get over them for a project well done.
Voila with two coats of sealer and two coats of exterior paint and a movable planter box is born! Tomorrow I will be able to add the dirt and plant the seeds.
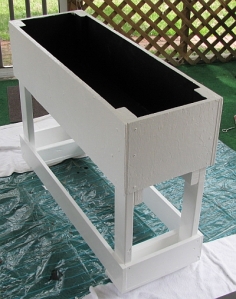
Measurements of this planter box are approximately 47 1/2 inches long, 16 inches wide, 36 inches high and the box itself is 12 inches deep.
Thank you for reading my blog.


 Blight Blog
chateycathey said,
March 17, 2013 @ 5:28 pm
Awesome job and looks like a great way to grow veggies. You did good.
grouchow said,
March 17, 2013 @ 5:36 pm
@CC….. it really was quite the project. Hope I get some good stuff out of it now. Thanks for the comment. 🙂
kornkountrytreasures said,
March 17, 2013 @ 6:40 pm
Hey, Ace, now you need to start selling the plans!! Shoot! This is good!! 🙂
grouchow said,
March 17, 2013 @ 7:55 pm
@KK……… Thanks for the post although I don’t think anyone would be interested in buying the plans. Maybe if I get requests. 😀
kornkountrytreasures said,
March 17, 2013 @ 6:42 pm
Ace, now you need to start selling the plans!! Shoot! This is GOOD!!!! 🙂
FleaPirates said,
March 17, 2013 @ 7:01 pm
This is a fabulous idea! I, too, have problems with not enough sun… how clever of you to think of a “portable” garden. I love it!
grouchow said,
March 17, 2013 @ 7:57 pm
@FleaPirates……. thanks for the comment……… I love the idea because I will be able to move it where more sun is needed during those shorter days. I didn’t know your blog was at wordpress. I’ll have to check it out. I had your other one from blogger.
maggiemaybecrafty said,
March 17, 2013 @ 7:54 pm
What a very handy lady you are Ace. Great job on this wonderful planter. A couple of these would be great for the strawberries I love so much.
grouchow said,
March 17, 2013 @ 7:59 pm
@Maggie… Thanks so much. I was thinking it would be good for strawberries too. We think on the same lines.
Dusty Corners said,
March 18, 2013 @ 1:14 am
You did an awesome job building that. And it is so versatile, even for flowers along with the veggies 🙂 My mom always planted mums and marigolds on the edge of the garden. Made it so pretty!
Would like to see more pictures as the plants mature and into the fall when the season ends. Thanks for sharing what you did. 🙂
grouchow said,
March 18, 2013 @ 5:54 am
@Dusty…… Thanks for the comment. The building part was mostly the project manager but I sure did have fun helping. Learned some tool tricks too.
plastic tube caps said,
April 12, 2013 @ 7:39 pm
I like looking through an article that will make men and women think.
Also, thanks for allowing for me to comment!
Chris Boyle said,
May 4, 2013 @ 1:08 pm
I love it! Great idea using the wire drain catch.
grouchow said,
May 5, 2013 @ 7:09 pm
@Chris…. Thanks for the comment. And the wire drain is working to let the water out and keep the soil in. 🙂